Configuring through the SDM is definitely the easiest way to go for wireless configurations, that is, if you’re using any type of security. And of course you should be! Basically, all you need to do to bring up an access point is to just turn it on. But if you do have a wireless card in your router.
Here’s a screen shot of my R2 router showing that I can configure the wireless card I have installed in slot 3.
There really isn’t too much you can do from within SDM itself, but if I were to click on the Edit Interface/Connection tab and then click Summary, I could enable and disable the interface, as well as click the Edit button, which would allow me to add NAT, access lists, and so on to the interface.
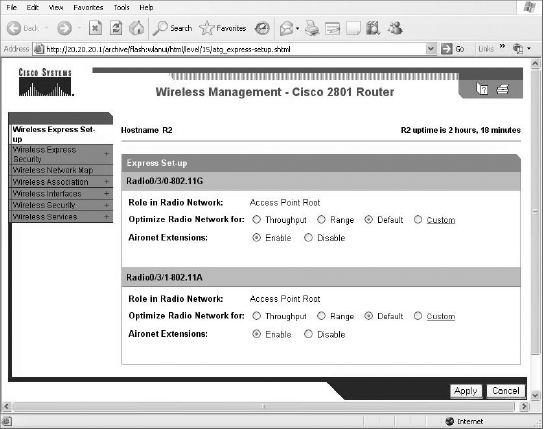
From either the Create Connection screen shown in the first screen of this section, or from the screen that appears when you click the Edit button of the second screen, you can click Launch Wireless Application. This will open up a new HTTP screen that your wireless device is configured from called Express Set-up.
This is the same screen you would see if you just typed HTTP into an access point—one like our 1242AP. The SDM will be used with wireless interfaces for monitoring, to provide statistics, and for gaining access into the wireless configuration mode on a router that has wireless interfaces. This is so we don’t have to use the CLI for the hard configurations.
Again, you can only configure some basic information from here. But from the next screen, Wireless Express Security, we can configure the wireless AP in either bridging mode or routing mode—a really cool feature!
The next screen shows the wireless interfaces and the basic settings.
The following screen shot is the second part of the Wireless Interfaces screen.
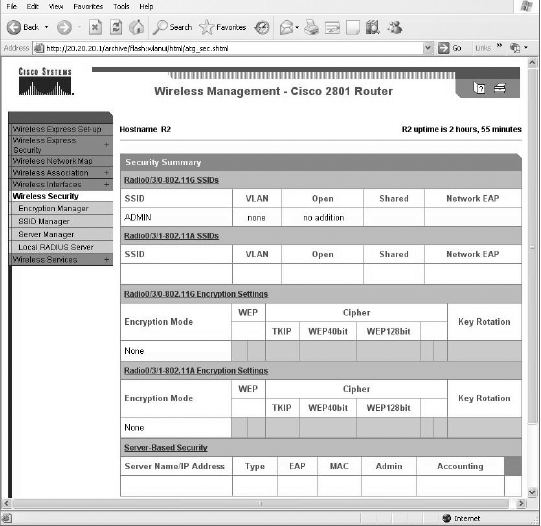
Under the Wireless Security heading is really where HTTP management shines! You can configure encryption, add SSIDs and configure your Radius sever settings.
 Now, if we just HTTP in to the 1242AG AP, we’ll see this screen.
This looks amazingly like the APs we’ll find in our ISR routers, and we can configure the same devices and security too.
Here’s a screen shot of my R2 router showing that I can configure the wireless card I have installed in slot 3.
There really isn’t too much you can do from within SDM itself, but if I were to click on the Edit Interface/Connection tab and then click Summary, I could enable and disable the interface, as well as click the Edit button, which would allow me to add NAT, access lists, and so on to the interface.
From either the Create Connection screen shown in the first screen of this section, or from the screen that appears when you click the Edit button of the second screen, you can click Launch Wireless Application. This will open up a new HTTP screen that your wireless device is configured from called Express Set-up.
This is the same screen you would see if you just typed HTTP into an access point—one like our 1242AP. The SDM will be used with wireless interfaces for monitoring, to provide statistics, and for gaining access into the wireless configuration mode on a router that has wireless interfaces. This is so we don’t have to use the CLI for the hard configurations.
Again, you can only configure some basic information from here. But from the next screen, Wireless Express Security, we can configure the wireless AP in either bridging mode or routing mode—a really cool feature!
The next screen shows the wireless interfaces and the basic settings.
The following screen shot is the second part of the Wireless Interfaces screen.
Under the Wireless Security heading is really where HTTP management shines! You can configure encryption, add SSIDs and configure your Radius sever settings.

This looks amazingly like the APs we’ll find in our ISR routers, and we can configure the same devices and security too.


